


Standards and Procedures:
Drainage on Existing Trails
Next to building a sustainable trail from the start and basic tread maintenance, installing and maintaining effective drainage on trails is the most important priority for keeping our trail system in good condition. The importance of drainage is all the more apparent in the Pisgah Ranger District, where heavy annual rainfall takes a toll on our trails. Digging drainage can be hard work and it’s not the most glamorous trail task - in fact, many times the goal is to be as subtle as possible. But good drainage puts substance over style, and simplicity over complexity. What it lacks in bells and whistles, drainage more than makes up for in effectiveness. It is generally a much more efficient use of time and resources compared to building structures, a task which should be reserved for cases where there is no other option.
If drainage is neglected, trails can degrade to a point where they require heavy rehab work, or even complete relocation. It’s sad to look at heavily degraded trails, knowing that if only routine maintenance (like cleaning out drains) had been performed, the problem would not exist. Relocation involves a long and drawn out process of NEPA, planning, design, and construction, which can easily take years. Let’s avoid this by making drainage a priority!
Drainage maintenance is the most important job of the individual maintainer or trail adopter! Drainage work can be accomplished safely by an individual with just a few tools, but delivers big dividends in resource protection. This document aims to lay out the goals for installing the best drainage features on our trails.
Key Points:
- Dig effective drains which are substantial and wide
- Maintain/clean existing drains frequently
- Locate drains strategically
- Build water bars properly when needed
See Also:
- Summary/Takeaways
- Tool/PPE Guidelines
- Gallery
- Additional Resources
Digging Effective Drains
Standards:
- Drains should be as wide as possible. If terrain allows, dig your drainage outlets to be at least 4 feet wide. Consider that the USFS trail notebook specifies a 6-10 foot wide outlet for rolling grade dips. This is a good goal to strive for.
- Dig substantial drains with approximately a 15% outslope. Even the best drains will eventually fill in with sediments/leaves and require maintenance, so you want to maximize the use you get out of a drain before it needs cleaning.
- Drains should cover the entire tread width. Don’t make the mistake of digging a tiny knick that barely reaches into the tread.
- Use a wide, gently curved fan shape for drains as the goal is to let water follow the path of least resistance off of the trail. If water hits resistance (like a 90 degree angle) it will drop sediments and fill the drain more quickly, or simply flow over and destroy the drain in the case of heavy rainfall.
Procedures:
- Digging a new drain is a significant task that should take much longer than a few minutes to construct. Approach drainage digging as your main task - it shouldn’t just be an afterthought.
- The mounded ramp on rolling grade dips (see below) is not always necessary, but may be helpful on steeper trail sections. Be sure to add crushed rock and compact mounds thoroughly with a McLeod or hand tamper, or they will turn to mushy mud during rain and cause more trail damage.
 Not all drains will look exactly like this example from the USFS notebook, but it is a good general design that properly emphasizes the wide outlet (6-10 feet), and bowl-like drain shape which is gently curved and deeper in the center.
Maintain the Drain
Standards:
- Generally speaking, drains should be cleaned of leaf litter and accumulated sediments, widened, and reestablished at least twice a year. Even the best drains need routine maintenance or they will eventually cease to function.
- Keep downed logs, branches, etc. out of drainage outlets, as these will cause the drain to clog much more quickly.
- Routine cleaning of drains is much easier than having to completely redig a drain that has filled in and no longer functions.
Procedures:
- The Pisgah Ranger District is full of existing drains that need some TLC. A skilled trail worker tries to imagine water flowing down the trail in one of Pisgah's signature downpours. Will the current drain adequately capture that water and divert it off the trail, or is water likely to simply flow over the compromised drain and keep going?
- Be sure to scrape all accumulated sediments and clumped leaf litter out of the drain, excavating to return the drain to its original shape. Broadcast material far downhill, to avoid blocking the flow of water.
- De-berm the trail leading to the drain, reestablishing good tread outslope. Proper sheet flow will take strain off the drain and prevent it from filling as quickly.
- If the original drain wasn’t dug effectively (i.e. not wide enough or deep enough - see above section) you should expand the drain to make it work appropriately. This can take a substantial amount of digging - be sure to broadcast all excess soil far downhill to prevent blocking the flow of water.
- Do not be afraid to cut out rhododendron, laurel, and other vegetation to widen drains effectively.
Drain Location
Standards:
- The frequency of drains is influenced by the grade of the slope. Consider a drain at least every 10 feet of elevation change. In areas that see significant erosion, you may add them more frequently.
- Add drains directly above structures like staircases, to reduce the effects of water washing over the steps and undercutting them.
- Pay attention to where you are diverting water. Avoid draining water only to have it flow right back on to the trail down below. In cases where there is no other option, install a second drain on the section below to take that water off the trail permanently.
- Older fall-line trails will give you very few opportunities to effectively divert water. Keep your eyes peeled for any spot where the topography may give you an opening.
Procedures:
- A good trail worker develops an eye for drainage, always observing and thinking about what water is doing on the trail. Think about drainage whenever you walk the trail and work on developing your “trail eyes.”
- Observe existing drains as you assess the trail and note whether they are frequent enough to be effective.
- Look out for strategic areas to divert water, like the bottom end of climbing turns, switchbacks, or natural curves in the trail where you have an opportunity to shoot water off with minimal change in water direction.
Water Bars
Standards:
- Water bars can be built of rock or locust logs. Be sure to peel the bark off of locust logs to slow the process of rotting. Be sure rocks are not too small.
- The bar should be embedded in the soil, not creating a tripping hazard that users tend to walk/ride around if they can. The structural bar is merely a reinforcement to a drain and the water is never meant to actually make contact with the rock/log bar itself.
- Imagine mountain bikes rolling over your bar, or horses stepping on it, and build it to withstand the pressure.
- Embed the bar so it is flush with the surface of the tread on the downhill side of the trail.
- Set the bar in the ground at an angle of at least 45 degrees to the trail. If water has to make a sharp turn, it will drop its sediments and the water bar will fill very quickly.
- Embed the end of the bar into the trail backslope/bank (ideally 12 inches).
- Water bars should be level across the length of the bar. There is no need to have one end of the bar higher than the other.
Procedures:
- To bar or not to bar? That is the question. In many cases, water bars are not necessary and can ultimately lead to more problems than solutions if they are not installed properly. There are countless examples of old water bars that are not even on the trail anymore because so many people have navigated around them, creating unsightly braided trails.
- Nevertheless, water bars can be useful, especially on steeper, erosion-prone sections where the added reinforcement from the bar helps to keep drains from washing out. In some cases, log water bars can be built into the top of log staircases.
 Note how this log water bar is almost imperceptible. The log is embedded into the ground and merely serves to reinforce the drain. How could this be improved? Widen that outlet!
Summary/Takeaways
Good Drains:
- WIDE! (4-10 feet)
- Fan-shaped
- Span the entire trail width
- Take water off the trail at strategic locations
- Cleaned and re-widened twice a year
- #1 Priority for Maintainers
Poor Drains:
- Tiny
- Narrow trenches
- Scraped rather than dug
- 90° Angles
- Ignored, unmaintained
Tool and PPE Guidelines
Tools:
- Pick mattock - best for heavy digging in rocky soil, good for new drains where substantial digging is needed
- Rogue hoe/hazel hoe - great for digging in softer soil, great for shaping drains and cleaning existing drains
- Shovel - good for removing and dispersing excavated soil. May be useful in shaping drains outlets.
-McLeod - excellent for finish work, creating smooth graded surfaces. Also useful for tamping and compacting soil. Ineffective for heavy digging in rooty or rocky soil.
- Loppers/folding saw - good for cutting out roots, clearing vegetation and brush that stands in the way of creating a wide, effective drain.
- Fire rake - can be used to disperse excavated soil and debris from drains.
- If building water bars, additional tools will be needed, including at minimum a single-jack sledge hammer for making crush and filling around embedded log/rocks to lock them into place. Other rock work or log work tools may be used as needed.
PPE:
- All required PPE should be worn including hard hat, boots, gloves, and eye protection.
- If any work with structures is being done, special emphasis added to eye protection as making crush presents a serious hazard to unprotected eyes due to shrapnel.
Gallery
 A drain dug on Big East Fork trail. Note the very wide outlet which gives water ample opportunity to flow off the trail in a wide sheet.
 A failed water bar. This is a great example of how a log which is too large and not embedded in the soil simply becomes an obstacle for trail users, who tend to travel around the bar and cut a wider trail, ultimately allowing water to flow around and rendering the water bar useless.
 Once a trail becomes deeply gullied, it is very difficult to repair and requires a huge amount of resources, which often makes it unfeasible. The section of Old Butt Knob trail leading up to Shining Rock is a prime example of a section where insufficient drainage coupled with excessive grade caused major trail degradation over time. It's crucial to maintain our drains so that trail conditions do not reach this point!
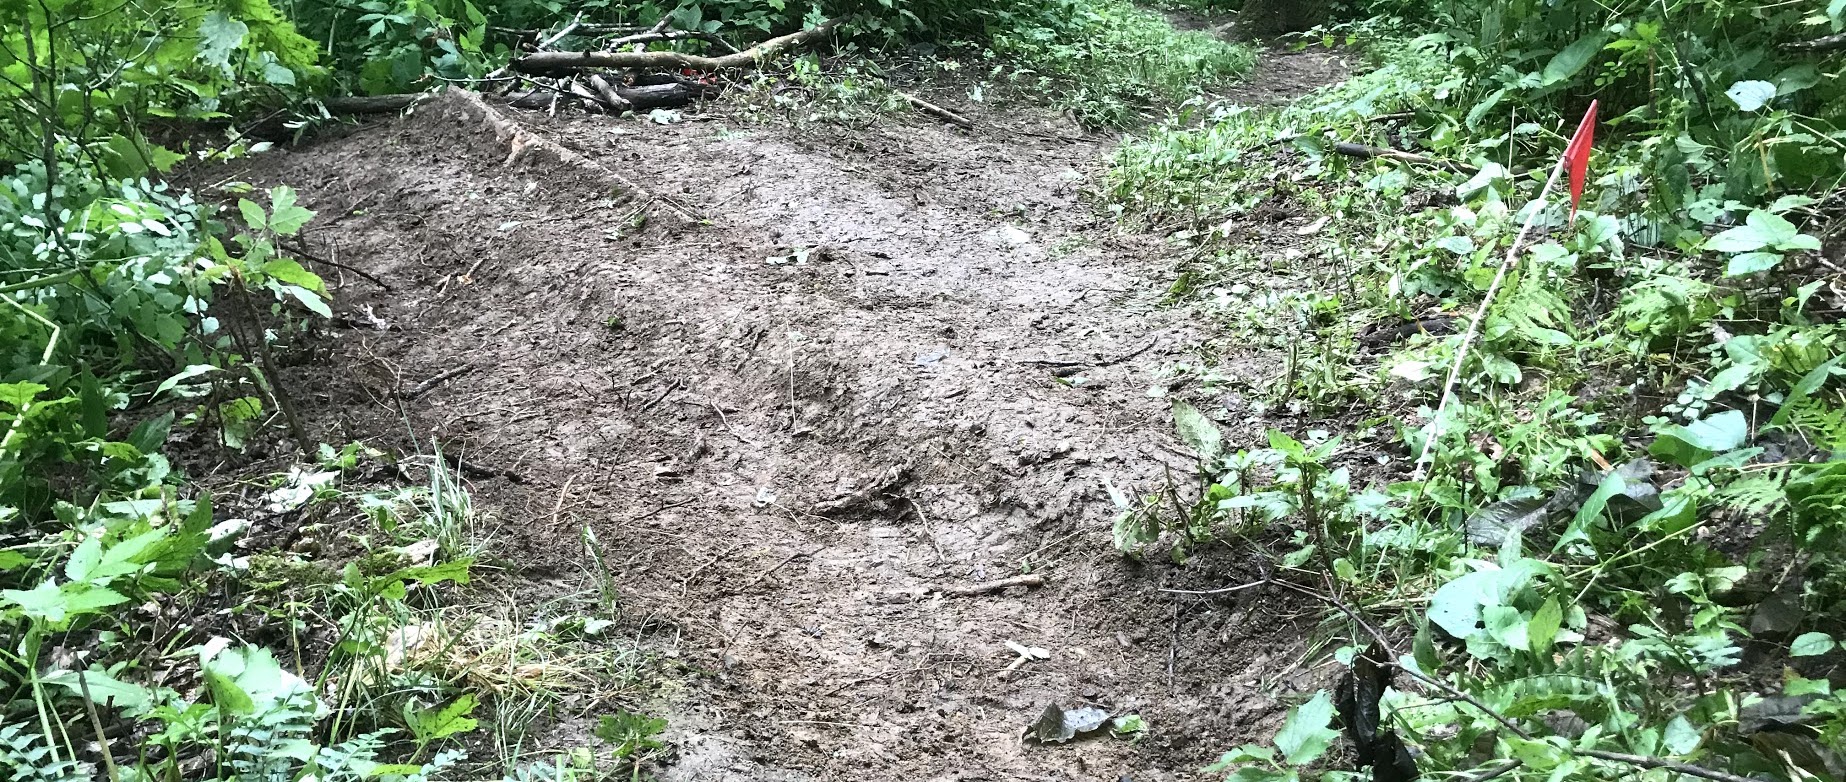
 Sometimes digging drainage is not feasible due to the topography of the landscape. The Eastatoe Trail is notoriously flat and difficult to drain. This photo was taken before the extensive turnpiking work completed in fall of 2020. Building a turnpike requires a lot of material, but is a great solution where topography is too flat or the trail is located in a low spot. See Locust Log Turnpike for more info.
Additional Resources
USFS Trail Class Matrix - This chart explains the differences in trail class, which should help guide maintenance decisions.